Sunday, October 30, 2011

Rock Additude Mini Tut


YAYAYAYAYAYAYA!!! It is finally open. The wonderful Justice Howard just opened her independent tube store!! Justice take super smokin pic of the sexiest inked babes on the planet. I am soooo stoked the store is open!!
Supplies used:
Tube from the super Diva Miss Justice Howard. You can find her tubes for sale HERE.

Scrapkit called Rock the Attitude by A [space] between. This was a limited time freebie and is now available for sale at Aussie Scraps.

Filters:
EyeCandy 4000 (Glass and gradient glow) (Font Only)

Font:
GFY Otep

Texture (Mine is leopard) and grunge brushes of choice.

What I used:
Paper 14
Black Frame (element 42)
Pink Frame (element 55)
Guitar (Element 73)
Piano Keys (element 52)
Bat heart (Element 72)
Black tulle (Element 58) (about 6 times)
Silver wing Skull (Element 56)
Girly Skull (element 34)
Purple Swirl (Element 44)
Pick (element 35) (3 times)
Ipod (Element 26)
Headphones (Element 22)
Earbuds (element 23)


Saturday, October 29, 2011

Nature's Goodies Tutorial (FTU Scrapkit!!)


Supplies used:
Tube by Zindy S.D. Nielsen. I bought this particular tube from MPT but they have since closed. You can buy Zindy's tubes from her indie site HERE.

FTU scrapkit by my girl Tasha called The Goodies Garden. You can get it on her blog Tasha's Playground.

Filter:
AlienSkin Xenofex 2 (constellation) (This is just for the wings...you could always use a sparkle tube or just skip the step )

Font:
Aquarelle

Ok let's get started

Open a new canvas size 500 by 500

C/P Frame 3. Rotate frame layer 90 degrees. Resize by 50%

C/P Grass 2.  Resize by 75%. Position so that is just overlapping the bottom of the frame.

C/P your tube. I resized mine by 75%. Position towards the bottom corner of the frame.

 C/P grass. Resize by 75%. Duplicate 2 time for a total of 3. Position as desired so it looks like it is going up the side of the frame.

 C/P Branch. Resize by 30% Position UNDER the grass shoots. Duplicate, Mirror. Move back under the grass.

C/P Branch 2. I used manual color correction on just the flowers. (or there is an element that has pink flowers already if you prefer.) Duplicate 2 time for a total of 3 and position as desired. 

Click on your tube. Use your lasso tool to select around just the flower of the tube. I used manual color correction to change it to match the pink flowers.

Using your lasso tool select just the wings. Again use manual color correction. The wings were a bit bright for my liking so I adjusted the brightness/contrast with these settings...


KEEP SELECTED!! Now add Alien Skin Xenofex 2 Constellation with the following settings...


Deselect.

Add drop shadow to tube and flower layers. I used the following settings...

Using your magic wand tool select the inside of your frame layer. Add a new rater layer and move it UNDER your frame layer.

C/P Paper 3 into selection. Deselect and change layer properties to soft light.

Select your bottom layer.

C/P flowers. Effects, Edge effects, Enhance. Resize by 50%. Duplicate as many times as needed and position so they fill the frame and add a nice border around it.

Now add your copyright and watermark.

Type out your font. I used inner bevel with these settings...


Add dropshadow and save :)


Friday, October 28, 2011

Look Into the Mirror Tutorial


Supplies Used:
Bloody Vanity Kit by Jessica. Get it at Gothic Inspirations.

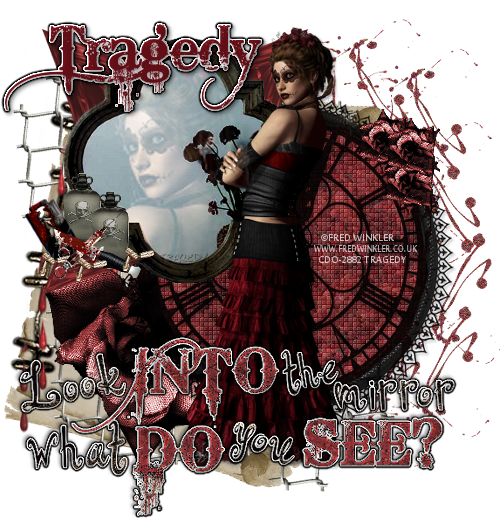
Sally May tube by The wonderful Fred Winkler. You can buy his tubes at CDO.

Font used:
Bleeding Cowboy

Filters used:
Eye Candy 4000 Gradient Glow
Xero Fritillary

Ok let's get started.
Open a new image size 600 by 600

So on this one I started with my tube cause I wanted to use it as a base for laying everything out. Add dropshadow with these settings...

C/P Mirror. Resize by 50%. I used manual color correction to change the mirror to a darker shade. I selected the frame of the mirror as my source color and black as my target.

Position mirror up towards the top of your tube layer. Move this UNDER the tube.

Use your lasso tool to select all the way around the inside of the frame. Add a new raster layer. C/P Just the top or face of your tube as a new layer. (if you have the close up even better but this tube does not). 

Resize your "face" by 200%. Position inside of your selection. Selections, Invert, Delete. (Again with a close up you can skip these steps)

Adjust opacity on "face" layer to Screen.

Okies now we can head to the underlying layers....

C/P Scroll Stapled. Resize by 60%. Use your deform tool to position scroll at a bit of angle. Move this layer to the BOTTOM of your canvas.

C/P Dripping sheet. Using your deform tool position so that drips completely cover your scroll layer.Adjust, Sharpness, Sharpen. Use your eraser tool to remove any drips that are off of the scroll.

C/P Metal Fence Piece. (If you like the way the fence looks you can leave it as is or your can follow my steps.) Resize by 45%. Use the deform tool to position fence at more of an angle. Position this piece just UNDER your mirror. Duplicate, Flip. Layer merge down. Duplicate again and mirror. Position as desired.
C/P Glass Gem  2 UNDER your mirror.

C/P Clock Vanity. Resize by 75%. Add the following dropshadow....

Use your Lasso tool to select all the way around the edges of your clock layer. Add a new raster layer and move under the clock. 

C/P Paper 8 into selection. Deselect. 

Add zero Fritillary with the following settings...


Select your clock layer and merge down. Move UNDER your tube layer and position.

C/P Flower. Resize by 50%. Position Just OVER your fence layer.

Duplicate flower. Resize by 50% again. Mirror. Duplicate flower again. Flip and position over the top of the first one. Layers, Merge down. Resize by 50% a 3rd time. Duplicate 2 time for a total of 3. Position these just OVER your clock layer.

C/P Old Bottle 2. Resize by 20%. Position the the edge of your mirror. Duplicate and move slightly down and to the right of the original.

C/P Razor. Resize by 20%. Use your deform tool to change the angle and position over the left side of your bottles.

C/P Needle. Resize by 20%. I positioned mine at the bottom middle of my bottles.

C/P Bloody knife. Resize by 20%. Position on the right corner of your lower bottle.

C/P pills. Resize by 10%. Duplicate 2 times for a total of 3. Position around the rest of the small elements for a scattered look.

C/P Wordart 2. Resize by 35%. Adjust, Sharpness, Sharpen More.  Add the following drop shadow...

The Gradient glow. Settings at 3, 25, 10. My second tab looks like this...

Then inner bevel with the following settings.... 
Repeat drop Shadow.

I used my eraser tool to remove the bits of her skirt that had a hard edge but your wont have to do that with all tubes :)

Add your copyright and watermark.

Add your font. I used the color from the skirt of my tube. Repeat drop shadow. Then Gradient Glow. Then Inner Bevel. Then drop shadow again.

I hope your enjoyed this tut and much as I did. I would love to see your results :)


Thursday, October 27, 2011

Boo-tiful Bash Mini Tut


Supplies used:
Bootiful Bash kit by my good friend Wicked Princess. You can get the kit at DigiDivas.

Font:
AL Meaningful

Filters:
Eyecandy 4000 and PSP Inner Bevel (Font Only)

A soft grunge mask of choice (I suck at keeping track of where I get mine)

Table element made by me for this tut which you can download from Mediafire HERE

What I used:
Canvas size 600 by 600

My little silly looking table. You are covering most of it up anyway. I did leave just a black layer in case you prefer it.

Paper 1

Elements resized by 50%:
Flags
Balloons (x2)

Resized by 30%
Cake
Zombie Shani
Miss Kitty Christina
Blob Omzy
Princess Chole
Cowgirl Lesia

Resized by 20%
Boo Juice (x4)
Boo Juice Cup (x2)

Resized by 15%
Goth Goblet (x3)
Gifts (x3)
Loot Bucket
Jack-O-Lantern (x2)

Resized by 10%
Kitty Skull Cupcake (x3)
Bat (x3)
Sucker (x3)

Resized by 5%
Candy 1 (x3)
Candy 2 (x3)
Candy 3 (x2)
Candy Corn (x5)

Thats it...super simple!!

Oh and BTW...My new Siggy is from the kit too...


Saturday, October 22, 2011

Where The Wild Roses Grow (Ralf Straaberg)

First off let me say this entire tut was inspired by my wonderful friend Ralf Straaberg. Without this beautiful tube I would not have been inspired to use these beautiful song lyrics. Thanks so much my friend!!!

 
Supplies Used:

Rose tube By Ralf Straaberg available at DSI .

Scrapkit called Horror Whorez and the freebie of the same name by the amazing Gothic Inspirations

Fonts:
Sakkal Majalla
Hurricane

Filters:
Eyecandy 4000 (Gradient glow)

Song Lyrics are by the Amazing Nick Cave And The Bad Seeds. Song is called Where The Wild Roses grow and is on the album B-sides and Rarities . You can listen to it and other songs on the official site HERE

Ok let's get started...This one is pretty simple but I hope it makes an impact.

I started with a canvas size 800 by 800.

C/P Frame 3.

Using your lasso tool select around all the edges of the frame. Add a new layer UNDER the frame. C/P paper 10 into selection.

Back on your frame layer. C/P tube. Use your magic wand to select inside of the frame again. Selections, modify, expand by 1. Invert selection and erase the bits that hang over your frame.

C/P Fence 2 UNDER your tube layer. Resize by 75% and Sharpen.

C/P Grass over your fence. Sharpen.

C/P Drink. Resize by 75% move UNDER your tube layer. Then up and to the right of the frame. Duplicate and move one of the glasses slightly up.

C/P tall candle. Resize by 75%. Use your selection tool to select the large base on the candle. Delete. Deselect. Move to the left of your frame. Duplicate 2 times for a total of 3 and position as desired.

C/P Booth over the candle layers.

C/P Leaves. resize by 50%. Duplicate 2 times for a total of 3 and position. I used the arch or my tubes arm as a guideline.

C/P Flower. Resize by 20%. Adjust your hue and saturation so the flower is a red color. (otherwise it will not show up well.) Duplicate 2 times for a total of 3 and position near the center of leaves.

C/P heart. Resize by 35%. I positioned mine to fill in the empty space in foliage.

C/P Needle 2. Resize by 50%.

C/P Blood Ink. Resize by 30%.

C/P Glass blood. resize by 50%. I lined mine up with the bottom of my tubes arm. Duplicate, Mirror, resize by 50% and position the glass UNDER the original.

C/P Razor. Resize by 30%. I positioned the razor so it looks like it may have fallen out of her hand.

Here I went a bit crazy with the blood stuffs due to wanting to fill out the tube I used and I always think the bloodier the better. I used the following elements for my blood pools.
Splatter 1 resize by 50%
Splatter 3
Blood Pool

Now using your Sakkal Majalla font size 20 type out your text for the top of the tag. Add eyecandy Gradient glow in red with these settings...
Repeat gradient glow in white.

Add drop Shadow. I used these settings...


Add your copyright and watermark.

Type out your name in the hurricane font. Add gradient glow same settings as before in red. Then again in white. Dropshadow.

Thanks so much for trying my tut! I look forward to seeing your results!!


Friday, October 21, 2011

Key to My heart Minitut (Sky, AOG)


Supplies used:
Bridgitt tube By Sky's Scraps from SATC

Scrapkit by Wicked Princess available only at The Art Of Giving. All items for sale on this site are for charity!!

Font:
Aquarelle

Filters:
Eyecandy 4000 (Gradient Glow)
Xero porcelain


Items Used:
Paper 15 (Manual color correction)
Lace Frame (Opacity 62)
Circled Ot Frame
Bling Circle Frame
Rose petals (Duplicate I used manual color correction)
Romantic Candles 
Rose Note
Fan
Butterfly Trail (Manual Color Correction)

I also used Inner bevel, Drop shadow, and Gradient Glow on my text. If you wanna know my settings just check a previous tut as I don't change them much.

Hope ya like it!!


Hunter Cazador Print Raffle/Givaway!! (AOG)

Interested in winning this amazing Hunter Cazador print for free?? Look below for details...

Just follow this link...The Art Of Giving and follow the instructions there. Don't forget to follow the blog :) Good luck to everyone!!


Sunday, October 16, 2011

Vampire Hell Tut...


Supplies used:

Amazing tube by Woz called Dawn of the Night. This tube is only available from The Art Of Giving. While you are there be sure to check out the site's mission. This is a Charity site for the tagging and PSP community.  What sets it apart from other programs is that you will be told where 100% of your funds are going. These first donations are going to a tagger who has been going without meds she desperately needs because she couldn't afford them. If you are familiar with the T.A.G fund you know how easily it can be frustrating to now know where your donations are going.
Scrapkit is called Vampire Hell and you can get it at Treasured Scraps

Font:
Raven

Filters:
Eyecandy 4000 (Gradient Glow)

Ok...Let's get started. This is a real quick and easy tut so I hope you have now problems following it :)

Open a new canvas size 800 by 800.

C/P Circle black red. Position slightly to the left of your canvas. I used my manual color correct to change the brown bits to red as well.

Using your magic wand select the inside of your frame. Selections, Modify, expand by 4. Add a new raster layer and move UNDER your frame. 

C/P tube into selection. 

Dropshadow.

I added clock 2 BEHIND my frame as a sort of background but you can skip this if you prefer it to be transparent.

C/P Cofin element. I used my lasso tool to remove the handles of the coffin. Resize by 50%. position on the right side of your frame.

C/P Grave bag 2. Resize by 50%. I positioned this slightly over my coffin.

C/P Lights. Resize by 50%. I used my deform tool to make the lights taller.

C/P love hurts 2. Resize by 50%. I changed my hue/saturation both to 0 for a greyscale effect.

C/P goblet. Resize by 50%. Duplicate and move just a touch down and to the right.

C/P Bottle 2. Resize by 50%. I used the deform tool again to make the bottle a bit taller and slimmer.

C/P Razorbrack. Resize by 50%. Place just UNDER your Love Hurts box.

C/P rose. Resize by 50%. Duplicate and use your deform tool to move on a slight angle. Merge down. Duplicate roses and mirror. Move into position.

C/P Raven. Resize by 50%. Effects, Edge Effects, Enhance.

C/P Vampire wordart. I used manual color correction to change to a red tint. Resize by 50%. Position just UNDER your elements and move to the left.

C/P Hell wordart #3.I used manual color correction to change to a red tint. Resize by 50%. Position just UNDER your elements and move to the right. Just position your words so they are centered on the tag.

Merge wordart layers together and add dropshadow.

C/P Element wen 3 (web). Adjust hue/Saturation both to 0. Position on top left of frame. Use your eraser to remove any bits that hang over the frame.

Add copyright and watermark.

Type name out in Raven font. Use inner bevel with these settings...

Then gradient glow in black...

and finally add a dropshadow.

Hopefully you enjoyed this tut and be sure to check out The Art Of Giving


Sky's Scraps Halloween Mini Tut...


This tut is super simple...Just a copy and paste kinda thing so I will just go over what I used for ya :)

Tube by Unholy Vault Designs. It was bought from MPT however the artist does sell at PTE now so if you want this tube ask Jo to get it on the site LOL.

Scrapkit made by the amazing Sky's Scraps called Halloween. You can find it and all her kits and tubes at SATC

Font used is called Raven.

I used the following paper just to fill in my arch:
Paper 1.

Tag was made simply out of the following elements:
Moon (Resized by 175%)
Arch
Tree (Manual color correction to black)
Element 10 (resize by 50% Duplicate and mirror)
Bat 1 (Resize by 50%. Duplicate and resize by 75%)
Element 2 (Resize by 50%)
Element 20 (Resize by 50%)
Element 12 (resize by 50%)
Element 4 (resize by 50%)
Dark Doll (Resize by 50%)

Easy peasy right?? Hope you like it :)


Everything Dies Tutorial (Peter Steele tribute)

Lemme just start this one off by saying Peter Steele was yet another brilliant musician taken before his time. My heart Goes out to his Family and surviving bandmates.


Supplies Used:
Peter Steele tube by Freya Langford-Sidebottom from her hotties rock series. Tube was bought from Dreamscape Imaging but I believe she is now with another company so ya may wanna look it up.

Scrapkit is Called "Dark October" By Witchy's Heart. This kit was made specifically for this tube. You can get this kit at Scrap-U-Nique.

Fonts Used:
Arial Black (I asked and this is the official font that Type O Used. It was confirmed by band members)
Satisfaction

Filters:
Eye Candy 4000 (Gradient Glow and Glass)

Ok Let's get started...

Open a new Canvas size 800 by 800.

C/P Arch #1. Resize by 70%.
Use your magic wand tool to select around the edges of the arch. Add a new Raster Layer. C/P paper 11 into selection. Select none and move your paper under the arch layer.

C/P Tombstone #2. Resize by 40%. Place towards the bottom half of your arch tube.

C/P Dead Ivy #1. Rotate by 90 degrees right. Resize by 90%. Position so it looks like it is climbing up the tombstone and arch.
C/P your tube. I lined mine up with the bottom of the tombstone and moved it slightly to the left .

C/P O Negative symbol. Resize by 70%. Move slightly up and to the left of your tube so you can see the bar in the center. Adjust Opacity to 50%. Move this layer to the bottom of your tag.

C/P Skull #3. Resize by 40%. Duplicate. Position skulls to cover the bottom of your tube.

C/P Candle #1. I used my manual color correction to change the brown in the candles to black. Resize by 10%. Position as you see fit. I used 2 under the skulls on the left side and 2 over my skulls on the right.

C/P Candle #2. Resize by 10%. Duplicate candle a few times an position as you like.

C/P Music notes #1. Resize by 40%. Duplicate and position as you like. Once notes are in place merge the 2 layers together and add Gradient glow with the following settings...


Using your Arial Black font type out R.I.P Peter Steele. (Of course this is all up to you but this is a tribute)
Add Eye Candy 4000 glass with these settings...


Now repeat your gradient glow with the same setting as before 2 times.

Dropshadow...This is what I used...

Now switch to you Satisfaction font. Type out "Everything Dies" In the green you have been using for your glow. Add Inner bevel with the following settings....

Apply Gradient glow with the same settings as before but change your color to black.

Finish the tag by adding your name with the Satisfaction font steps.

I hope you enjoyed this tut. And for all the Type O fans out there I hope this image does justice to the amazing work the Peter Steele and the rest of Type O Negative gave us over the years. Peter's passing was truly a huge loss and he will forever be missed. RIP.

Blog Award take 4...

This one come from Terri at Creationz By Witchy's Heart


I would like to give this award back to my beautiful friends...


Blog Award Take 3....

This award was given to me by the Lovely Lesia of Deadly Desire Tags


I would love to share this award with the following awesome blogs....


Thursday, October 6, 2011

Friday the 13th Scrap Tut


Supplies used:
Summer Camp tube by Scott Blair. Get it at PTE.

Bloody Zombie Mary kit by Witchy's Heart. You can get it at Scrap-U-Nique.

Sign and lake element are made by Breeze. You can get them Here.

Cabin and Crystal lake sign made by me and you can download them HERE

Font Used:
Friday 13 (You can find this at dafont)

Ok Let's get started.

Open a new canvas 800 by 800.

Selections, Select all. C/P Paper 15 into selection. Deselect.

C/P Lake. Position in right hand corner. Because of the background I chose I used my eraser tool to remove a few of the ripples at the top.

C/P Gate #1. Resize by 50% or use your deform tool and position over the bushes  on the left side of the background. I used my eraser tool to make it look like the gate was behind the bushes.

C/P sign by Breeze. Resize by 50% 2 times. Position over the gate so it looks like it is the camp entrance. Again I used the eraser tool at the bottom of the sign so the bushes look like they are in front of it.

I added Camp Blood to the sign with my Friday 13 font. Dropshadow.

C/P Cabin. Move to the left side of you canvas somewhere near the middle. I used my deform tool to make the cabin look slightly thinner.

C/P Crystal lake sign so it looks like it is hanging on the cabin. Dropshadow.

C/P Ivy tube on cabin. Resize by 50% 2 Times. I duplicated this a few time and used my deform tool to position it to make it look like it was growing on the cabin.

C/P Bloody Handprint. Resize by 10%. Change layer properties to Overlay.

C/P Tree 2. Resize by 50%. Position this BEHIND your cabin.

C/P Moon resize by 50% then 75%. Position in top right of your tag.

C/P fog 2. Position on top left corner of your tag. Duplicate and mirror. Move down to the bottom right of tag...This should be ABOVE your element layers. Changer opacity to 52.

C/P Dead bush. Resize by 50% 2 times. I duplicated 3 time for a total of 4 and positioned across the bottom right of my tag.

C/P  Toxic drum #2. Mirror. I adjusted the hue and saturation both to 0. Position on bottom left corner of tag.

C/P bloody skull. Resize by 10%. Adjust hue and saturation both to 0. Position skull on top of tallest drum. Duplicate, Mirror. Position on the drum laying on it's side.

C/P Machete. Resize by 30%. I used my deform tool to make it lay more on it's side.

C/P Bloody Chainsaw. Resize by 30% and position over the machete. I Moved both the machete and chainsaw under the barrel layer.

C/P Tube of choice. Dropshadow.

Add copyright and watermark.

Add font. I changed the layer properties on my font to Darken. Dropshadow.

That's it. I would love to see your results!


Blog award take 2...

This was given to me by Tasha at Tasha's Playgorund. I love this crazy girl so much I dunno what I would do without her!!


And some of the girls who I love:

My first blog Award!!

This was given to me by the super Crystal at Crystal's Creationz. Thanks for being awesome and having my back when I needed it girl!!


And a few blogs that make me smile...

Tuesday, October 4, 2011

Music in me Tut


Supplies used:
Tube by Redfill. This tube is a private commission but you can purchase all his other work at PFD 
Awesome kit called Music in Me by my girl Tasha. It can be purchased at Aussie Scrap Designs

Font:
Aquarelle (This is a PTU font but there are plenty of awesome script fonts out there :)

Filter:
Eye Candy 4000 (Gradient Glow)


Ok lets go.

Open a new image 800x800. C/P frame 4.

C/P Disco ball UNDER heart frame. Resize by 75%. Move slightly up and to the right.

C/P your tube (You can do this later but I like to use it for reference). Dropshadow.

Back on your heart frame layer. Use your magic wand to select inside one of the hearts. Selections, Modify, Expand by 3. Paste paper of choice. I used paper 6. Keep selected.

C/P tube again. Position under your heart frame. select the tube layer if it isn't already. Selections, Invert, Delete. Change opacity on tube layer to dodge. Select None.

C/P Piano keys. Move these just UNDER your other layers (I had to resize mine by 125% so I could make the tube stand on it but you dont have too :)

C/P Ipod
C/P ring of notes and Ring of Notes 3. Position just above your background layer.

C/P Skull bow. Resize by 50%

C/P Scatter and swirl.

C/P Skull bow 2. Resize by 50%.

C/P Wordart. Use your deform tool to position.

C/P Flower 2. I used this to fill in the empty space between my other elements.Move just above background layer.

C/P Music note. Resize by 50%. Duplicate and mirror. Move duplicate so it overlaps the original a bit.

C/P Bubbles.

  Add copyright and watermark.
Add font. Inner bevel with these settings...

Dropshadow....

Gradient glow...

Hope you enjoyed this tut :)