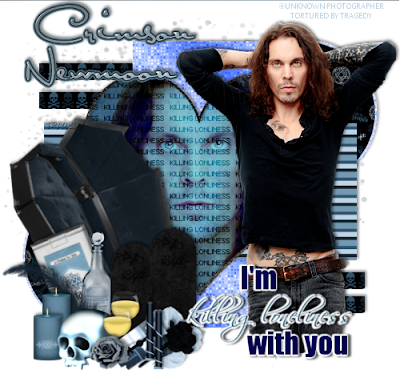
Supplies Used:
Dark Light kit by the amazing Manipulated by Magik. You can get it HERE.
Tube is a newly released band photo that was extracted for me by a friend. This tut will work with any tube though :P
Valentine Template #1 by Manipulated By Magik. You can find the info on where to get them on her blog HERE.
Eyecandy 4000 Gradient Glow & Glass
Font: Satisfaction.
Open up the template and delete the credit layer.
Select the background layer. We will be working our way from the bottom of the template up.
Delete the background layer.
Select the bottom right bar 1 layer. Selections, Select all. Then click float. Add a new raster layer.
Open up paper 28. Use your crop tool to crop the paper down to just one row of skulls.
C/P Paper 28 into selection.
Deselect.
Delete Bottom right bar 1 layer.
Dropshadow skull paper layer.
Select the bottom right bar 2 layer. Selections, Select all. Then click float. Add a new raster layer.
Paste Paper 28 into selection.
Deselect.
Delete Bottom right bar 2 layer.
Dropshadow skull paper layer.
Select the Top Left bar 1layer. Selections, Select all. Then click float. Add a new raster layer.
Paste Paper 28 into selection.
Deselect.
Delete Top Left Bar 1 layer.
Dropshadow skull paper layer.
Select the Top Left bar 2 layer. Selections, Select all. Then click float. Add a new raster layer.
Paste Paper 28 into selection.
Deselect.
Delete Top Left Bar 2 layer.
Dropshadow skull paper layer.
Select the bottom left circle layer.
Selections, Select all, Float.
Add a new raster layer.
C/P Paper 4 into selection.
Deselect.
Delete Bottom left circle layer.
Select the Bottom left circle frame layer.
Adjust the Hue/Saturation to a blue color to match the rest of the tag. Dropshadow.
Select the Top right circle layer.
Selections, Select all, Float.
Add a new raster layer.
C/P Paper 4 into selection.
Deselect.
Delete Bottom top right circle layer.
Select the Top left circle frame layer.
Adjust the Hue/Saturation to a blue color to match the rest of the tag. Dropshadow.
Select the Rectangle 1 layer. Adjust Hue/Saturation to a blue color that matches your tag. Dropshadow.
Select rectangle 2.
Go to selections, Select all, Float. Add a new raster layer.
C/P Paper 22 into selection.
Deselect.
Delete Rectangle 2.
Dropshadow Paper layer.
Select the heart background layer.
Selections, Select all, Float.
Add a new raster layer.
C/P Paper 12 into selection.
C/P your close up tube if you are gonna use one.
Go to selections, Invert, Delete.
Delete the original heart background layer.
Select the pixel words layer.
Go to Adjust, Color Balance, Negative image.
Select the heart frame layer.
Go to Adjust, Color Balance, Negative image.
Select the Killing Loneliness Word Art layer.
Go to Adjust, Color Balance, Manual color correct.
Set the source to the color the word is, The target to the color you want to change it too.
Select the Word Art 1 layer.
Go to Adjust, Color Balance, Manual color correct.
Set the source to the color the word is, The target to the color you want to change it too.
C/P your main tube. Dropshadow.
Position tube under the word art layers.
move all 6 word art layers to the top, Keeping them stacked color on top, Then glow layer, Then shadow layer.
Merge together the wordart layers.
C/P Casket. Resize by 75%.
Image, Rotate, Free rotate 90 Degrees.
Use your deform tool to position the casket on an angle along the left side of the heart.
Using your eraser tool eraser the legs off the casket.
Dropshadow Casket.
C/P Ciggies. Resize by 30%. Dropshadow. Use your deform tool to position.
C/P Bottle. Resize by 40%.
Adjust the hue/Saturation on the bottle to match your tag. Dropshadow. Position to the right of the ciggies.
C/P Tomb. Resize by 40%. Dropshadow. Duplicate. Position both tombs near the bottom center of the heart.
C/P Feather. Image, Mirror. Resize by 40%. Dropshadow. Position so the feather falls over the ciggie pack.
C/P Candle. Resize by 20%. Dropshadow. Duplicate. Position slightly left of the tip of the feather.
C/P Skull. Resize by 30%. Dropshadow. Position just over the right side of the candles.
C/P Wine. Resize by 20%. Dropshadow. Duplicate. Position glasses up the right side of the skull.
C/P Pressed Flower.
Image, Rotate, Free Rotate 90 degrees.
Resize by 25%. Dropshadow.
Position pressed flower over the right side of the bottom of the tomb.
C/P Rose. Resize by 20%. Dropshadow. Position over the pressed flower.
C/P Razorblade. Resize by 20%. Dropshadow. Use your deform tool to position over just the bottom of the wineglasses.
C/P Flower. Resize by 20%. Dropshadow. Position at the bottom of the glasses.
C/P Candle 2. Resize by 20%. Dropshadow. Duplicate.
Make sure your wor Art layers are at the top of your palette.
Add your font.
Apply Eyecandy 4000 Gass of choice.
Add Eyecandy 4000 fat Gradient glow of 3. On tab 2 change the color to black for the first box and blue for the second.
Dropshadow font.
Don't forget to add your copyright and watermark!


No comments:
Post a Comment