Showing posts with label Screaming Demons. Show all posts

Saturday, February 9, 2013

Dogma mini tut...

Supplies Used:
Dom Zombie tube by Screaming Demons. Get it at SATC.
Tempest kit by Bibi's Collection. Get it at SATC.
Eyecandy 4000 Glass & Gradient Glow
Font: Willy Wonka (Do Not Use The Caps)

What I used:
Paper 8
Element 17 (150%)
Element 25 (75%) (Duplicate & Mirror)
Element 16 (50%)
Element 36 (75%)
Element 13 (50%)
Element 11 (75%)
Element 46 (50%)
Element 43 (30%)
Element 50 (30%)


Wednesday, January 16, 2013

A Glimpse Back tut...

Supplies Used:
Lil Gothabilly tube by Screaming Demons. Get it at SATC.
Memories kit by Tasha's Playground. Get it at DSI.
Eyecandy 4000 Gradient Glow & Glass
Texture of choice.
Font: Tension

Open a new image size 500 by 500.
C/P Window.
Resize by 75%.
Select the insides of the window.
Selections, Modify, Expand by 3.
Add a new raster layer under the frame layer.
C/P Paper 1 into selection.
Flood fill each section in black using the texture of choice.
Add another new raster layer.
Apply Eye Candy 4000 Glass.
Deselect.
Dropshadow Window.
C/P Scatter 2.
Resize by 75%. Dropshadow 
Position over the right side of the window.
C/P Flower 5.
Resize by 60%. Dropshadow.
Position near the bottom right of the window.
C/P Flourish.
Resize by 30%. Dropshadow.
Duplicate. 
Position Flourishes over the top right side of the frame.
C/P Lantern 2.
Resize by 30%. Dropshadow.
Duplicate lamp.
Position lamps to look like they are hanging from the flourishes.
C/P Steps.
Image, Mirror.
Resize by 50%. Dropshadow.
Position starting over the top left pane of the window.
C/P Flowers.
Resize by 60%.
Image, Flip, Mirror.
Position over the bottom of the steps.
C/P your tube.
Dropshadow.
Position over the left side of the window.
Type out your font.
Apply inner bevel of choice.
Add Gradient Glow of 3.
Dropshadow.
Select your background layer.
C/P Frame 4.
Resize by 75%. 
Use your deform tool to position the thorns sticking out from under the window.
Duplicate thorns.
Change the layer property to Multiply.
Dropshadow original thorn layer.
Don't forget your copyright & Watermark.

Tuesday, January 15, 2013

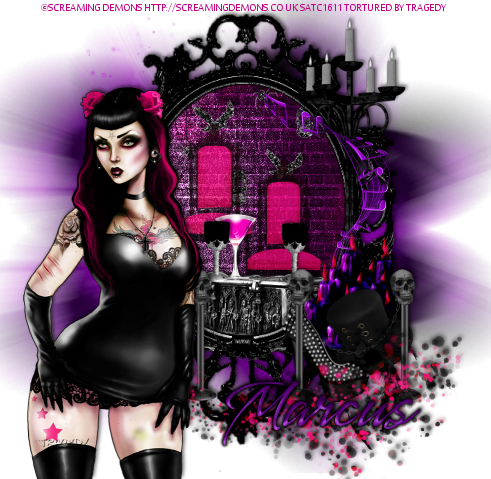
Creature's Night At The Castle tut...

Supplies Used:
June tube by Screaming Demons. Get it at SATC.
Bad Valentine kit by Bibi's Collection. Get it at SATC.
Eyecandy 4000 Gradient Glow (Font Only)
Font: Vujahday Flourish

Open a new image size 500 by 500.
C/P Element 34.
Image, Rotate, Free rotate 90 degrees.
Resize by 75%.
Select the inside of the frame using your magic wand.
Selections, Modify, Expand by 3.
Add a new raster layer under the frame layer.
C/P Paper 3 into selection.
Add another new raster layer.
C/P Paper 9 into selection.
Change the layer property to overlay.
KEEP SELECTED.
C/P Element 12.
Resize by 35%.
Position under the top edge of the frame.
C/P Element 2.
Resize by 30%.
Change the opacity of the chair to 72.
Duplicate chair and position them as desired.
C/P Element 5.
Resize by 30%.
Position under the bottom edge of the frame layer.
Selections, Invert.
Hit delete on the chair, Coffin, And dangle layers.
Deselect.
Duplicate "coffin" layer.
Change the layer property to multiply.
Dropshadow the dangle, Chair, & Original coffin layers.
C/P element 76.
Resize by 25%. Dropshadow.
Position on top of the "coffin table".
C/P Element 4.
Resize by 25%. Dropshadow.
Duplicate drink.
Position drinks on the table.
C/P Element 44.
Resize by 50%. Dropshadow.
Position over the right side of the frame layer.
C/P Element 20.
Image, Mirror.
Resize by 50%. 
Adjust, Color Balance, Manual color correct.
Set the source to gray, The target to a purple color and apply.
Position over the candles.
C/P Element 37.
Resize by 50%. Dropshadow.
Position at the bottom of the candelabra.
C/P Element 10.
Resize by  40%. Dropshadow.
Position over the bottom right side of the candles.
C/P Element 60.
Resize by 50%. Dropshadow.
Position to the left of the top hat.
C/P Element 11. 
Resize by 50%. Dropshadow.
Position near the bottom of the hat and shoe.
C/P Element 39.
Resize by 30%.
Image, Flip. Mirror.
Position at the bottom of the posts.
Dropshadow.
Type out your font.
Apply inner bevel of choice.
Add Gradient Glow of 3.
Dropshadow.
Select your background layer.
C/P Element 45.
Resize by 65%.
Duplicate & Flip.
Don't forget to add your copyright & watermark.


Tuesday, October 16, 2012

Dark Of The Witch tut...

Supplies Used:
Dark Star tube by Screaming Demons. Get it at SATC.
Sexy Witch kit by Bibi's Collection. Get it at SATC.
Eyecandy 4000 Gradient Glow.
Font: Raven

Open a new image size 500 by 500.
C/P Element 53. Resize by 150%. 
Position near the top of your canvas.
C/P Element 77. Resize by 75%. Position over the moon.
Change the opacity of the clouds to 60.
C/P your tube over the left side of the canvas so you can use it for position.
Dropshadow tube.
C/P Element 96. Dropshadow.
Position to the right of your tube.
C/P Element 80. Dropshadow.
Position about a 3rd of the way up the right side of the tube.
C/P Element 55. Resize by 40%. Dropshadow.
Position About halfway up the right side of the throne.
Move layer under the throne.
Duplicate cauldron.
Change the layer property to multiply and the opacity to 50.
C/P Element 84. Resize by 50%. Dropshadow.
Position flames over the bottom of the cauldron.
Move flames under the throne if they are not already.
C/P Element 57. Resize by 50%. Dropshadow.
Position over the bottom of the throne.
Duplicate graves.
Change the layer property to Multiply & the opacity to 50.
C/P Element 99. Resize by 20%. Dropshadow.
Duplicate candle.
Position one candle on either side of the graves.
C/P Element 11. Resize by 50%. Dropshadow.
Position between the black candles.
C/P Element 61. Resize by 30%. Dropshadow.
Position the owl in the branches of the tree.
Move your tube to the top layer.
Type out your font.
Apply inner bevel of choice.
Add Fat Gradient Glow of 3 in contrasting colors.
Dropshadow.
Don't forget your copyright or watermark.

Saturday, August 25, 2012

Brutally Vicious tut...

Supplies Used:
Zombie Sid Vicious tube by Screaming Demons. Get it at SATC.
Vicious Rocks kit by Amy Marie. Get it at SATC.
Make Some Noise template by Tonya & Kat. Get it from the Creative Misfits blog HERE.
Eyecandy 4000  Gradient Glow & Glass
Fonts: Vulgar Display of Power & Jennifer's Handwriting

Open the template.
Delete the word art, Background, & info layers.
Resize the template to 550 pixels wide.
Starting at the bottom and working our way up...
C/P Wire 2. Resize by 50%.
Go to image, Rotate, Free rotate 90 degrees.
Dropshadow wire.
Position under the upper right side of the template.
Duplicate wire.
Go to image, Flip, Mirror.
C/P Element 24. Dropshadow. Position over the wire in the upper right corner.
Duplicate, Flip, & Mirror.
Select the glitter oval black layer.
Go to adjust, Color Balance, Manual color correct.
Set the source to color #0d9a5d and the target to color #6c8b3f.
Dropshadow Glitter Oval.
Select the oval layer.
Merge down.
Use your deform tool to bring the top of the oval down a bit.
Select the right Arrow Glitter Back.
Set the source to color #0d9a5d and the target to color #6c8b3f.
Dropshadow right arrow glitter back.
Select the right arrow.
Selections, Select all, Float.
Add a new raster layer.
C/P paper 15 into selection.
Deselect.
Delete original right arrow.
Select the left Arrow Glitter Back.
Set the source to color #0d9a5d and the target to color #6c8b3f.
Dropshadow left arrow glitter back.
Select the left arrow.
Selections, Select all, Float.
Add a new raster layer.
C/P paper 15 into selection.
Deselect.
Delete original left arrow.
Select the rectangle layer.
Selections, Select all, Float.
Add a new raster layer.
C/P paper 8 into selection.
Deselect.
Delete the original rectangle layer.
Dropshadow your new paper layer.
Select the bottom rectangle layer.
Selections, Select all, Float.
Open paper 8. Use your selection tool to choose a small portion of the paper.
C/P your selection into the selection on your tag.
Deselect.
Delete the original bottom rectangle layer.
Dropshadow the new paper bottom rectangle.
Select the white rectangle layer.
Selections, Select all, Float.
Add a new raster layer.
C/P Paper 21 into selection.
Deselect.
Delete the original white layer.
Dropshadow the Black Rectangle frame layer.
C/P Drums. Resize by 40%. Dropshadow. 
Position near the center of the black lightening paper layer.
C/P Element 68. Resize by 20%. Dropshadow.
Position over the top right corner of the black lightening paper layer.
C/P Speaker. Resize by 20%. Dropshadow. 
Duplicate speaker. Position both to the right of the drums.
C/P Element 71. Resize by 20%. Dropshadow. 
Position at the bottom of the speakers.
C/P Element 74. Resize by 30%. Dropshadow.
Use your deform tool to position the pass over the bottom of the road case.
C/P Element 67. Resize by 20%. Dropshadow.
Position over the pass.
C/P Guitar. Resize by 40%. Dropshadow.
Use your deform tool to position between the drums and the other elements.
Move the music notes to the top layer. 
Go to adjust, Color Balance, Manual color correct. Set the source to the pink color in the note, The target to a red in the tube. Dropshadow.
C/P your tube. Dropshadow.
Using the Vulgar Display Of Power font in caps color #959d6b type out "brutally".
Covert to raster layer.
Apply glass of choice.
Add Eyecandy Gradient Glow of 5 in #91160e.
Dropshadow.
Using the Jennifer's Handwriting for in color #91160e type out "Vicious"
Convert to raster layer.
Apply glass of choice.
Add Eyecandy 4000 Gradient glow of 3 in #959d6b.
Dropshadow.
Add your name repeating the steps with Jennifer's Handwriting.
Don't forget to add your copyright & Watermark.

Sunday, July 22, 2012

Sweet Six Six Six tut...

Supplies Used:
Bubbles tube by Screaming Demons. Get it at SATC.
Breathe Me kit by Tasha's Playground. Get it at SATC.
Eyecandy 4000 Gradient Glow
Font: Pixelette & Saginaw
Mask Of Choice
My Wordart: Click to open, Right Click to save...


Open a new image 500 by 500.
C/P Frame 3. Use your deform tool to position on a slight angle to the left.
Select the inside of the frame using your magic wand.
Selections, Modify, Expand by 3.
Add a new raster layer under the frame layer.
C/P Paper 9 into selection.
Using the pixelette font size 8 type out your text/lyrics inside the selection. Go to selections, Invert Delete to remove anything that falls outside of the selection.
Deselect.
Dropshadow.
Change the layer property to Overlay.
Duplicate Overlay. Change the layer opacity to 50.
Dropshadow frame layer.
C/P Branch 2. Resize by 75%. Dropshadow. Use your deform tool to position over the left side of the frame just under the scrollwork.
C/P Branch. Resize by 75%. Dropshadow. Go to Adjust, Color Balance, Manual Color Correct. Set the source to white and the target to pink. Position over branch 2.
C/P Rose. Resize by 50%. Dropshadow. Duplicate and mirror. Position over the branches.
C/P Clock. Resize by 40%. Dropshadow. Position INSIDE the bottom curve of the frame.
C/P Candle 2. Resize by 50%. Dropshadow. Duplicate. Position candles to the left of the clock.
C/P Petals. Image, Rotate, Free Rotate 90 degrees.
Resize petals by 40%. Image, Flip. Position under the edge of the candles.
C/P Sparkle 2. Image, Rotate, Free rotate 90 degrees. Resize by 75%. Dropshadow. Duplicate. Position both sparkles over the petals one slightly higher than the other.
C/P Candle 1. Resize by 50%. Dropshadow. Duplicate. Position along the bottoms of the original candles.
C/P Bottle 2. Resize by 30%. Dropshadow. Duplicate. Position bottles next to the candles about midway across the clock.
C/P Bottle 1. Resize by 30%. Dropshadow. Position botween the candles and the higher jeweled bottle.
C/P Books. Resize by 50%. Dropshadow. Position to the right of the clock.
C/P Flower Band. Resize by 30%. Dropshadow. Position over the bottom left of the books.
C/P Flowers 2. Image, Flip. Resize by 30%. Dropshadow. Position under the flower band.
C/P Chair. Resize by 50%. Dropshadow. Position over the bottom right of the frame.
C/P your tube. Position in the chair. Dropshadow.
C/P Phone. Resize by 50%. Position over the bottom right of the books.
C/P my wordart. Position next the the top right of the frame.
Using the saginaw font type out your name in the bottom left corner of the tag. Apply Inner Bevel of choice.
Add Eyecandy 4000 gradient glow of 5 in pink.
Dropshadow font.
Select the background layer.
C/P Paper 10 as a new layer.
Apply mask of choice and merge group.
Don't forget your copyright & watermark.


Friday, June 8, 2012

Mermadia tut...

Supplies used:
Mermaid tube by Screaming Demons. Get it at SATC.
Magic Sea kit by Bibi's Collection. Also available at SATC.
Font: SP Pretty Purky
Eyecandy 4000 Gradient Glow (Font only)

Open a new image size 500 by 500.
C/P Element 35. Resize by  55%.
Select the inside of the frame with your magic wand. Selections, Modify, Expand by 20.
Add a new raster layer. C/P Paper 10 into selection.
Deselect.
C/P Element 60. Resize by 75%. Dropshadow. Position over the center of the frame layer.
C/P Element 90. Resize by 50%. Position near the bottom right of the frame.
C/P Element 96. Resize by  50%. Position over the bottom left of the frame.
C/P Element 94. Resize by 60%. Position over the left of the frame. Dropshadow.
C/P Element 31. Resize by  50%. Position along the curve of the wave. Dropshadow.
C/P Element 18. Resize by 50%. Dropshadow. Duplicate and mirror. Position both at the bottom of the tree.
C/P Element 4. Resize by 50%. Position to cover the bottom of the frame.
C/P Sand. Resize by 50%. Dropshadow. Change the layer opacity to around 60. Position under one side of the frame. Duplicate and mirror.
Select your top layer. C/P your tube. Dropshadow.
Select the paper layer. Type out your font. Apply inner bevel of choice, Gradient Glow of 3, Dropshadow.
Don't forget your copyright and watermark!

Tuesday, May 1, 2012

Bitchin Birthday tut

Supplies Used:
Happy Birthday tube by Screaming Demons. Get it at SATC.
Posh Birthday kit by Inzpired Creations. It is part of the super huge birthday collab from SATC. Spend $10 in the store and this awesome collab is yours free!
Fonts: Daisy MF and Daresiel Demo
Eyecandy 4000 Gradient Glow

Open a new image size 500 by 500.
C/P Frame 1. Resize by 60%.
Use your magic wand tool to select inside the frame. Selections, Modify, Expand by 2.
Add a new raster layer. C/P Paper 3 into selection. Deselect and move under your frame layer.
Dropshadow frame.
C/P your tube. Dropshadow.
I added the following elements:
Balloons 1 (60%)
Balloons 2 (60%)
Drinks (40%)
Champagne Glasses (40%)
Champagne (40%)
 Cake 1 (40%)
Present 1 (40%)
Present 2 (40%)
Present 4 (40%)
Cupcake 1 (20%) (2 times)
Cupcake 2 (20%)
Dropshadow elements.
With the Daisy font type out Bitchin' Birthday. Apply inner bevel of choice. Apply Gradient glow fat of 3. Dropshadow.
With the Daresiel Demo font type out Wishin You A. Apply inner bevel and standard Gradient glow of 3.
Don't forget your copyright and watermark!


Friday, April 13, 2012

Edward tut (FTU!)

Supplies used:
Edward tube by Screaming Demons. Get it at SATC
Edward freebie kit by Addictive Pleasures. Get it HERE.
Mask of choice
Eyecandy 4000 Glass & Gradient Glow (font only)
Alienskin Xenophex 2 Burnt Edges
Font: Be Safe

Open a new image size 500 by 500.
C/P Window. Resize by 75%. Adjust Color Balance, Manual color correct. Source set to a color from the window. Target to a dark gray. 
Select the inside of the window. Selections, Modify, Expand by 2.
Add a new raster layer. C/P BG1 into selection. Deselect and move under the window.
Duplicate Background. Change the layer property to multiply.
C/P Roses. Resize by 75%. Adjust Color Balance, Manual color correct. Source set to a color from the roses. Target to a dark red. Dropshadow.
Duplicate and mirror. I moved one side of my roses slightly above the other.
C/P Lantern. Resize by 50%. Dropshadow. Position to one side of the window.
C/P your tube. Dropshadow. (I resized mine by 50%.)
C/P Tree 2. Image, Rotate, Free Rotate 90 degrees. Resize by 50%. Dropshadow. Position to one side of the bottom of the window. Duplicate and mirror.
C/P Leaves 3. Resize by 30%. Dropshadow. Position near the bottom right of the frame.
C/P Flower. Resize by 15%. Dropshadow. Duplicate 2 times and position over the leaves.
C/P Book. Resize by 20%. Dropshadow and position in the bottom left corner.
C/P Cello. Resize by 50%. Use your deform tool to position on a slight angle. Dropshadow.
C/P Clock 2. Resize by 25%. Dropshadow. Position under the top of the cello.
C/P Sheet music. Resize by 10%. Adjust, Sharpness, Sharpen. Dropshadow. Use your deform tool to position at the bottom of the clock. 
Duplicate and position over the bottom of the original.
C/P Apple. Resize by  20%. Position near the bottom of the sheet music. Dropshadow.
C/P Candles 2. Resize by 35%. Duplicate. Change the layer property to multiply.
C/P Pocket Watch. Resize by  30%. Dropshadow. Use your deform tool to position.
C/P Sheet Music. Resize by 50%. Position under the top of your window.
Apply Alienskin Xenophex 2 Burnt Edges...
Dropshadow.
Duplicate. Rotate 15 Degrees right.
Duplicate and mirror.
Select your background layer. C/P Paper 10 as a new layer.
Apply mask of choice and merge group.
Type out your font.
Apply Eyecandy 4000 Glass and Gradient Glow of 3. Dropshadow. 
Don't forget your copyright and watermark :)

Friday, April 6, 2012

La Bella Muerte tut...


Supplies Used:
Red Death tube by Screaming Demons. Get it at SATC.
Dream of Death kit by Addictive Pleasures. Get it HERE.
Font: VTKS Sonho
Eyecandy 4000 Gradient glow (Font Only)

Open a new image size 500 by 500.
C/P Frame. Resize by 75%.
Using your magic wand tool select the inside of the frame. Selections, Modify, Expand by 2.
Add a new raster layer. C/P Paper 1 into selection. Deselect and mover under frame.
Dropshadow frame.
C/P Moon. Resize by 75%. Dropshadow. Position under the paper layer.
C/P Leaves 2. Resize by 50%. Dropshadow and flip. Duplicate. Position along each side of the frame layer.
C/P Tree. Resize by 60%. Dropshadow. Position on the left side of the frame.
C/P Coffin. Resize by 75%. Dropshadow. Use your deform tool to position.
Duplicate coffin and change the layer property to Multiply.
C/P Mirror. Resize by 50% and mirror. Dropshadow. Use the deform tool to position under the coffin.
C/P Cross 4. Resize by 40%. Dropshadow. Use your deform tool to position. 
C/P Gravestone. Resize by 40%. Position over the right side of the coffin. Dropshadow.
C/P Gravestone 3. Resize by 30%. Duplicate and position next to the first grave.
C/P Candle. Resize by 20%. Dropshadow. Duplicate a few times and position over the graves.
C/P your tube. Dropshadow.
C/P Ivy. Resize by 75%. Dropshadow. Position near the bottom of your tube.
C/P Vine. Resize by 40%. Flip. Dropshadow. Position Over the gravestones. Duplicate and mirror.
C/P Flowers 2. Resize by 40%. Dropshadow. Position over the bottom of the cross.
C/P Crow. Resize by 30%. Dropshadow. Position at the bottom of the tag in the center of the red leaves.
C/P Gargoyle. Resize by 30%. Dropshadow. Duplicate and mirror. position UNDER the crow.
Type out your font. Apply inner bevel of choice. Apply Gradient glow of 3 in black. Repeat Gradient glow but change the color to red. Dropshadow.
C/P Rosary Beads. Resize by 50%. Dropshadow. Use your eraser if your like to remove a few of the beads to make it look like it is hanging from the cross.
Select your background layer. Selections, Select all. Paste paper 10 into selection. (You can always skip this step I just thought it made the font pop more :)
Add your copyright and watermark.